Saturday, December 25, 2010

Whale softie

Here are two whale softies that I made for my 5 yr old son this Xmas. He liked them so much he carries them around constantly. The little one is the size of the original pattern, and the big one is enlarged to be about 70-80cm long. They were very easy to sew. The pattern is free online and is from Small Dreamfactory. I´ll probably make a couple more in the in-between sizes so we have a pod... Thanks for having the free pattern online Small Dreamfactory!

A beach near Dunedin, South Island, New Zealand

Monday, December 6, 2010

More stripey socks

Just in time, I´ve finished these stripey socks for my sister-in-law Evi for Christmas. The wool is Heirloom sock wool, which my mum sent me from Australia. The pattern is the basic sock pattern from Wendy Knits Socks from the Toe Up.


Near Dunedin, South Island, New Zealand

Christmas decorations

Here are few Christmas decorations I made the other day.

The Christmas Elf is a standard easter bunny pattern with a hat instead of ears. Ooops, just realised that this guys needs his own elf ears, so I´ll get onto that now...

The Nutcracker man is the Blossom Bunny pattern from the Penguin Softies book, however, if I made more, I´d take 2 cm off the width to make him a tiny bit thinner. The Soldier Nutcracker man is the only one of these decorations that my son likes (well, at least he´s honest...sob). But that´s probably OK, because my husband was born very near the Erzgebirge region, so sewing Nusscracker decorations are probably pretty appropriate for our family. I also altered the Blossom Bunny pattern by leaving out the circular base altogether. The stuffing hole is left in the side, and the top and base are sewn across (right side still together) and then lain flat, and have had the corners sewn across. This makes the top and base square rather than circular. I´ll take some work in progress pictures to show how this is done when I make some more.

The Wichtelmann is from the german book Kuscheltiere Nähen from Topp books, which my sister in law sent me. I sewed him in Xmas fabric. Mmm - I kind of like him, but I think I´d just sew little Christmas trees, halving the side, all in one colour Xmas fabric next time.

On top of Mt Ruapehu, North Island, New Zealand

Christmas bunting

Christmas! I´ve finally gotten onto making some Christmas bunting between bouts of colds, after caving in and buying some pinking shears on sale at Thimbles & Threads.

You just cut out lots of isosceles triangles and them wrong sides together 1cm in from the edge. Then cut the edges with pinking shears. Finally stick the tops inside a length of bias binding tape and sew along the tape edge. Ta da!

The Pinnacles, Mt Ruapehu, North Island, New Zealand

Pencil case rolls


Here another couple of pencil rolls from Soulemama´s Creative Family book which I made as gifts for friend´s sons. Its made a huge difference to my son, and he actually likes drawing things now. I realised after sewing them that I did the ties wrong - there should be two ties on one side only... oops. I just cut one off. Many thanks to wonderful Jellyspec for the fabric from her fabric stash.


Wellington Harbour, from our old flat, North Island, New Zealand

More bean bags...

Whew. More bean bags. I´m getting quite quick at making these, so I´ve decided to make them as gifts for people at our Playcentre who finish their Te Wai course (as I´m the Education Officer). Each little bag gets 4 or so bean bags in them.


Near Dunedin, South island, New Zealand

Tuesday, November 23, 2010

Peasant / folk t-shirt I designed

Here is a muslin of another go at designing a tshirt. I´ve just watched the original ice-dancing section of the 2009 Olympics and I loved all the peasant and folk costumes the skaters wore. This tshirt was supposed to be gathered at the neckline, with another underlayer at the neckline, like a peasant shirt, with cap sleeves. I think I´d like to try something like this again, but with a woven fabric peasant shirt.
The neckline on the paper-pattern is a very defined flat U-shape, like a folk peasant shirt, but made up in a knit material it curves alot more, like a scoop neck. I´d might make the U-shape sharper neck time.
The neckline is a 1:2 increase for gathering, just at the base of the neckline, and 1cm up on the neckline curve, (but no additions on the sides). I did the increases as per Cal Patch´s book Design It Yourself:Patternmaking simplified. I took the sides in slightly so that the shirt would not be too baggy due to the extra fabric along the neckline.
The fabric is some lycra from my friend Anna - thank you! The purple is cut off an old scrap tshirt.
Lyttleton Harbour, South Island, New Zealand

Friday, November 19, 2010

Amy Butler Cabo Halter

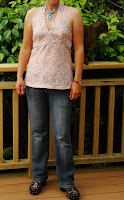
Here is my first go at the Amy Butler Cabo Halter. I made the Medium size. I didn´t alter the length, however, I did do a SBA (or more accurately, a NEBA), so that the neckline didn´t gape, by altering the angle of how the front top meets the front bodice. I sewed it together as per the pattern using 4.5cm stitches to see what size gape needed fixing, undid it, then moved the front pieces about 2cm down in the centre. (not at the sides). This was great and solved the problem, until I edgestitched the top bodice, which somehow stretched the fabric marginally (but enough to gape again). I´m not sure what I would do next time, as I think the bodice does need edgestitching and joining as the halter top is very low cut. Perhaps, do sba fitting after edgestitching.
The left hand pic is with the top worn as a halter top, which gapes a bit imho. The ties just reach to the back upper bodice, so I could turn the ties into shoulder straps - the right hand pic is with the ties pinned as shoulder straps instead. Still considering which option to do.
The pattern is easy to follow, and I´ll definitely make some more (with a better SBA). Also, it is very low cut, and I think I´ll add 1/2 cm onto the neckline next time.
Wellington Harbour, from our old flat, North Island, New Zealand

Monday, October 25, 2010

Bean bag party favours for boy´s party

I´m a bit sick of all the plastic things that go with birthday parties, so I thought I´d make some mini bean bags as the party favours for my son´s party. The finished size of the square bags are 2 inches square (not including seam allowances), and they have only about 1 1/2 to 2 tablesppons of wheat in them. They don´t feel heavy at all, but they are actually just the right size to do bean bags games, but without incurring that head-breaking velocity that a 5 year old can create throwing any heavier beanbag. I put them in little bags, but I forgot to take pics before giving them out, so here they are in a little bag I made a while ago.
It was a pool party, so I thought I´d do an ocean theme, and started making fish bean bags, a tiny bit bigger. These were for the guests´ younger siblings, who also came. I experimented with lots of different types (fin, no fin, edgestitched), and decided that the best prototype fish :o) was the one in the bottom left hand corner (no edgestitching, no fin).


Wanganui River, North Island, New Zealand

Sunday, October 24, 2010

Feet wheat packs

Here are some wheat packs for feet which I´ve made for my son´s kindergarten teachers as a goodbye present. The blue and green things are the inserts, and the yellow, red and pink ones are the covers. The covers slip on the wheat packs like pillow-covers. I´ve drawn up some instructions on how to make them, and I´ll add them here in a few days.

Near Opotiki, North Island, New Zealand


Short sleeved funked out peasant blouse

I used to have a long sleeved white funked out peasant blouse, but the long sleeves seemed too heavy on me, so I converted it to a short sleeved version. I do like this version much better.

I still really like peasant blouses, but I think I´ll try some different versions. I think I have enough of the Funked Out Peasant Blouses (pattern by Lila Tueller) now!


Featherston, North Island, New Zealand

Green funked out peasant blouse

Mmm. Not sure about this one. In the fabric shop this looked like a nice shade of green, but having sewn it up, it seems a pretty drab shade.

I´ve also realised that the long-sleeve funked out peasant blouse (great pattern by Lila Tueller), doesn´t really suit me. The sleeves puff out too much and just make the whole thing look too heavy on me. I didn´t take a photo of the unaltered ¨before"version unfortunately; I only realised after making the blouse, that I needed to reduce the sleeves. I felt a bit like a clown, or a milkmaid or something (its not the pattern´s fault, just my build). I didn´t want to completely unpick the whole thing, so I just took out 2 inches from the outside of the sleeve and shirred it a bit. (If I made it again, I´d just take 2 or more inches out of the width of the sleeve when cutting it from the fabric). The seam is very obvious, but hopefully the shirring makes the seam look intentional? Or not. I definitely like the blouse better with the sleeves de-puffed (as per this photo). Although, due to the bad choice of fabric, I´m not sure how much I´ll wear this.

On this version I also halved the width of the empire band, and made it end centre front, leaving the join open. I did a very thin string of the same fabric and this means I can get it over my head without needing a zip and tighten it slightly once its on.


Kaikoura, South Island, New Zealand

A-line skirt I designed

Here is an a-line skirt I drew up the pattern for after reading Cal Patch´s Design It Yourself: Patternmaking Simplified book. I followed the drawing-up instructions, but in the end I just tried on the skirt and adjusted it to fit correctly that way (which is also part of the instructions). After having kids I´m not the regular shape anymore anyway, so making my own skirt pattern seems the best way to go. The fabric is a very, very lightweight denim. That makes it comfortable, but it doesn´t seem to sit the same way all the time (sometimes it ruffles, sometimes it sits flat etc). Next time I would use a medium weight denim, possibly with less sweep.


Porangahau, North Island, New Zealand

Retro apron

This is really a ¨wardrobe refashion¨ of an emmeline apron I did a few years ago which used a pretty overpowering over-retroed fabric. My husband couldn´t eat his dinner while I was wearing it. So I made it into a half-apron. Its still a bit too retro, but as a half apron, its not quite as overpowering hopefully.


Kaikoura, South Island, New Zealand

Thursday, September 9, 2010

Another art pencil carry case

Here is another art pencil carry case from Soulemama´s Creative Family book. I should have taken the pencils out to take the photo - they kind of bunch it up a bit at the bottom! It does sit straight when there are no pencils in it. I made this for a friend´s daughter to say thanks for giving me a skirt.

Near Porangahau, North Island, New Zealand

Friday, September 3, 2010

Wardrobe refashion: brown vest

This is a wardrobe refashion of a brown knit collared top. I had intended to make it into a sewn version of the Cavern cardy on Ravelry, finishing it off with handsewing like in the Alabama Chanin book. However, I rather liked how this looked with the collar and sleeves cut off, so I left it like that (sides taken in though). So, another time for the Cavern cardy. I didn´t hand sew the edges as I preferred this with a clean, unadorned edge. The ¨before¨ pic is below.

Linocut ruru owl

Again inspired by Lena Corwin´s wonderful book Printing by Hand, I´ve tried some test samples of another linocut stamp I´ve designed and cut. Its about 8cm tall.
This is a Ruru, a native New Zealand owl. The Māori legends have the ruru often as a watchful guardian, associated with the spirit world. Its high call can mean bad news, but its more common ‘ruru’ call means good news. We can hear them from our house at night saying ¨morepork!¨ (that´s what it sounds like to me).
The left-most owl in the row of 3 is the final one, with the stamp edges progressively cut off (as I realised they were showing - I hadn´t cut quite deeply enough) and was pressed on the fabric the longest. I´ve been using a mixture of Pebeo and Fas Fastex fabric inks, which both seem fine, although these particular owls were purely done in Fastex black ink with a brayer. I like how this has turned out and I´ll print these on some bags.
The row of 3 owls looks quite nice, I think. I might cut another owl in reverse so I can print them in pairs. [I´ve since used the stamp on some feet wheat packs as a gift].

The Seaward Kaikoura Mountains, South Island, New Zealand

Everywhere tote bag

I made another Everywhere Tote bag from Heather Ross' Weekend Sewing book. This is from some fabric from wonderful Jellyspec's stash. Thanks Jellyspec!! Its great to be able to fill up this huge, huge bag and still be able to sling it over my shoulder. I made it on late nights while really sleepy, so it had quite a few mistakes and unpicking in it. But it turned out fine in the end.


Near Dunedin, South Island, New Zealand

Saturday, August 28, 2010

Art pencils carry case

I got Amanda Soule-Blake´s book Creative Family for my birthday too and am reading through it. I´m up to the art chapter at the beginning. My 4 year old isn´t really much into art and drawing, but the idea is showing that we value his creativity and creations. I thought I´d give it a go and make him a special carry case for his pencils. I made it slightly differently than in the book. The cover is a separate piece of material. It is all sewn together right sides together, turned right way out through a small hole, then edgestitched. The material is from wonderful Jellyspec´s stash. Thanks Jellyspec! It´s not quite as long as the one in the book. I have a few more of these to make as gifts for friends' kids, and then I´m going to make a big A3 fabric envelope to keep his artwork in.